Unity AI, step 2: install MCP for Unity 10.3.0 and connect Cursor
Prepare Git, uv and Python, install a pinned package, start HTTP Local, and verify a read-only scene query.
Last updated
Menus and supported features can change. Compare the source-check date below with your current app version.
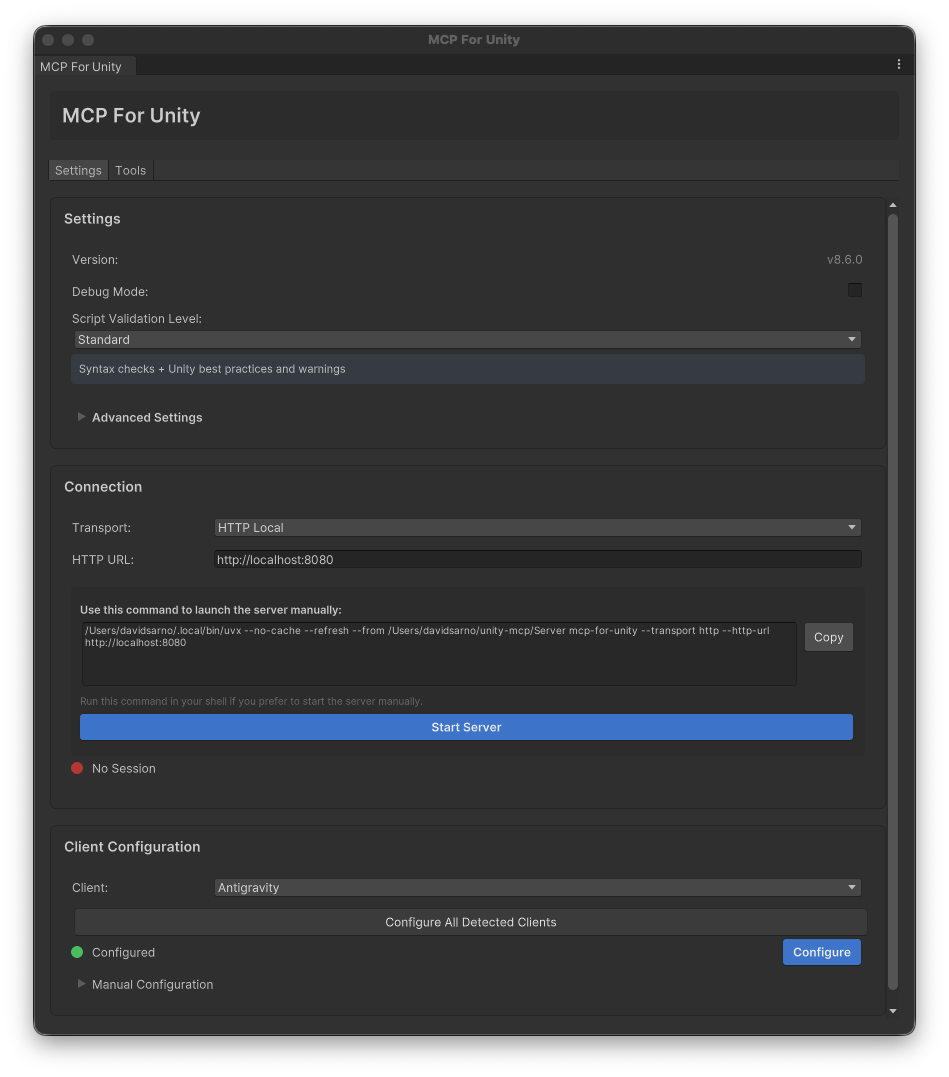
The cover is the repository’s developer example from v8.6, not our capture of the current 10.3.0 interface. MIT · Media credits
The target is a Cursor AI client reading the active Unity scene. Verify that boundary before asking it to create anything. These Editor and Cursor steps are documentation-based instructions for the checked package, not a completed end-to-end connection test. Our separate server probe is described in the introduction.
1. Prepare the practice project and dependencies
Have a working Unity Editor license and a Cursor installation in which you can use an AI model. If needed, follow the engine setup and first scene first. Open a separate practice project, initially keep only one Editor open, and record the saved scene path.
For Git-URL installation, obtain Git from its official download page and check git --version in a newly opened terminal. Install uv using one suitable method from the official instructions. On Windows with WinGet, use the first command below. On macOS with an existing Homebrew installation, use the second. They are alternatives for different environments.
winget install --id=astral-sh.uv -ebrew install uvReopen the terminal and check uv --version. If Python is missing, uv python install 3.12 prepares a concrete version and uv python list shows available installations. Python 3.12 is our example, while the documented minimum is 3.10. Use an environment permitted by your computer’s administrator. Managing Python
2. Add the exact Unity package
On screen: Open Package Manager from Unity’s top menu. Use the add menu and Git URL field, wait for import and compilation, then check the package name and version in the list. The add button and layout can differ between Editor versions.
Open Window → Package Manager, select + → Add package from git URL…, and enter:
https://github.com/CoplayDev/unity-mcp.git?path=/MCPForUnity#v10.3.0The path selects the Unity package inside the repository; the tag identifies the checked release. Verify MCP for Unity 10.3.0 in Package Manager and allow importing and compilation to finish. Preserve the first Console error before adding more configuration. The short README still contains an older pin example, so this guide matches the release tag against package.json rather than copying that example blindly. Pinned installation source
3. Start the local connection in Unity
If the setup wizard opens, resolve its Python and uv dependency checks. Select Done, choose Cursor from detected clients, and use Configure Selected. Return later through Window → MCP for Unity.
Choose HTTP Local in Connection and a loopback server address such as http://localhost:8080. Start Server launches the server and attempts to start the session. If the server runs but the session does not connect, inspect the status and log; where a connection button is shown, use Connect. These controls were cross-checked against the version’s connection code. Hosting a public HTTP Remote server is outside this beginner task.

The historical screenshot contains a developer’s local command path. Do not copy that machine-specific path. Use the values generated in your installation. Distinguish the server base address from the client’s MCP endpoint: in this local example the latter is http://localhost:8080/mcp.
4. Inspect Cursor’s configuration
On screen: Check the server and Unity session states separately in the MCP window. The developer’s v8.6 image above is an orientation reference; it does not establish the 10.3.0 layout or a successful connection.
After automatic setup, find and enable unityMCP in Cursor’s MCP list. The package’s older menu wording may differ from current Cursor: the checked Cursor documentation manages servers from Customize in the sidebar. Open a new conversation and inspect available tools.
For manual project-scoped setup, use .cursor/mcp.json. The global alternative is ~/.cursor/mcp.json in your home directory. Merge an entry into an existing mcpServers object instead of overwriting unrelated servers, and do not register the same connection under another name if automatic setup already did so.
{
  "mcpServers": {
    "unityMCP": {
      "url": "http://localhost:8080/mcp"
    }
  }
}
This example is for Cursor. VS Code’s servers layout and Claude Desktop’s stdio configuration are different; use the appropriate configurator when changing clients.
5. Verify a query before changing the scene
In Cursor: Open the MCP server list, check that unityMCP is enabled and tools are available, then send a read-only request in a new chat. If an approval appears, inspect its target and arguments. Compare the returned scene name and path with the open Unity scene; a status color alone is not proof of success.
Ask the client to read the active Unity scene’s name and path. Inspect the proposed tool call and arguments: manage_scene with action: get_active is a read operation. No creation or deletion is needed. Review the operation if the client asks for approval.
Compare the returned name with the scene open in Unity. Tool discovery, server status, and a successful live Editor response are separate checks. Only the last establishes the connection objective. An Editor-not-found message is not a completed connection.
Keep the Editor version, package version, client, HTTP address, and returned scene path in your notes. There is no need to put secrets into a public screenshot or working record. The next task uses this verified connection to create a cube, save the scene, and reopen it.
Next step: 3. Make the first scene.
Sources & further reading
- https://github.com/CoplayDev/unity-mcp/blob/aa5fc638d623f56178d50329d9ad8c541a57fe66/MCPForUnity/package.json
- https://github.com/CoplayDev/unity-mcp/blob/aa5fc638d623f56178d50329d9ad8c541a57fe66/website/docs/getting-started/install.md
- https://github.com/CoplayDev/unity-mcp/blob/aa5fc638d623f56178d50329d9ad8c541a57fe66/website/docs/getting-started/clients.md
- https://github.com/CoplayDev/unity-mcp/blob/aa5fc638d623f56178d50329d9ad8c541a57fe66/website/docs/getting-started/first-prompt.md
- https://github.com/CoplayDev/unity-mcp/blob/aa5fc638d623f56178d50329d9ad8c541a57fe66/website/docs/reference/tools/core/manage_scene.md
- https://github.com/CoplayDev/unity-mcp/blob/aa5fc638d623f56178d50329d9ad8c541a57fe66/website/docs/reference/tools/core/manage_gameobject.md
- https://github.com/CoplayDev/unity-mcp/blob/aa5fc638d623f56178d50329d9ad8c541a57fe66/website/docs/reference/tools/core/read_console.md
- https://github.com/CoplayDev/unity-mcp/blob/aa5fc638d623f56178d50329d9ad8c541a57fe66/website/docs/guides/troubleshooting.md
- https://github.com/CoplayDev/unity-mcp/releases/tag/v10.3.0
- https://cursor.com/docs/mcp
- https://github.com/CoplayDev/unity-mcp/blob/aa5fc638d623f56178d50329d9ad8c541a57fe66/LICENSE