NVIDIA PAIR tutorial: send a request and identify the serving computer
Prepare PAIR 1.0.0 and Ollama, save a request and response, and verify the serving node in Jobs. A documentation-based walkthrough.
Last updated
Menus and supported features can change. Compare the source-check date below with your current app version.
The goal is to send one short AI request through PAIR, save its response, and identify the computer that actually handled it. This walkthrough follows the official v1.0.0 documentation. BumbleV has not installed or executed this workflow, so outputs below are expectations rather than observed results. For the concepts behind the steps, start with the PAIR introduction.
Prepare for the task
You need one computer for PAIR, an internet connection and storage for model downloads, and enough memory to run your chosen model. To verify routing between computers, prepare a second machine on the same trusted local network. Check one computer first, then add the second so failures are easier to isolate. Use PAIR 1.0.0 on both and record the engine version and exact model name you actually install.
This example uses Ollama with the OpenAI-compatible request format. That describes the message structure sent to your local model; it does not mean you are calling a paid OpenAI model. Check the engine’s hardware requirements and the model’s terms separately. PAIR can download a model during the Add model step if you do not have one yet.
1. Install the appropriate PAIR release
Choose the installer matching your operating system and CPU architecture from the official v1.0.0 release. The Windows x64 example is NVPAIR-Setup-1.0.0-x64.exe. On macOS, open the disk image and move NVIDIA PAIR to Applications. Debian-based Linux uses the .deb package. The archive containing only services and the terminal interface is separate from the ordinary desktop installer.
At first launch, select the inference engine to install. Ollama is enough for this example. Finish setup and check that Overview shows your computer’s card. If it remains on Loading…, inspect Settings → Service before proceeding. Establish basic service health before diagnosing model downloads or pairing.
2. Start the engine and prepare a model
Open Overview → your computer’s card → Engine settings, check that Ollama is installed, and switch it on. Expand the engine, select Add model, and wait for the download to finish. Copy the model’s exact name from the inventory for your request file. A different tag or a model belonging to another engine is not automatically interchangeable.
Check installation, download completion, and engine readiness separately. A visible computer card does not establish all three. If an engine requires an explicit load operation, perform it as well. MODEL_NAME below is a placeholder you must replace, not an actual model recommendation.
3. Copy the endpoint and check its inventory
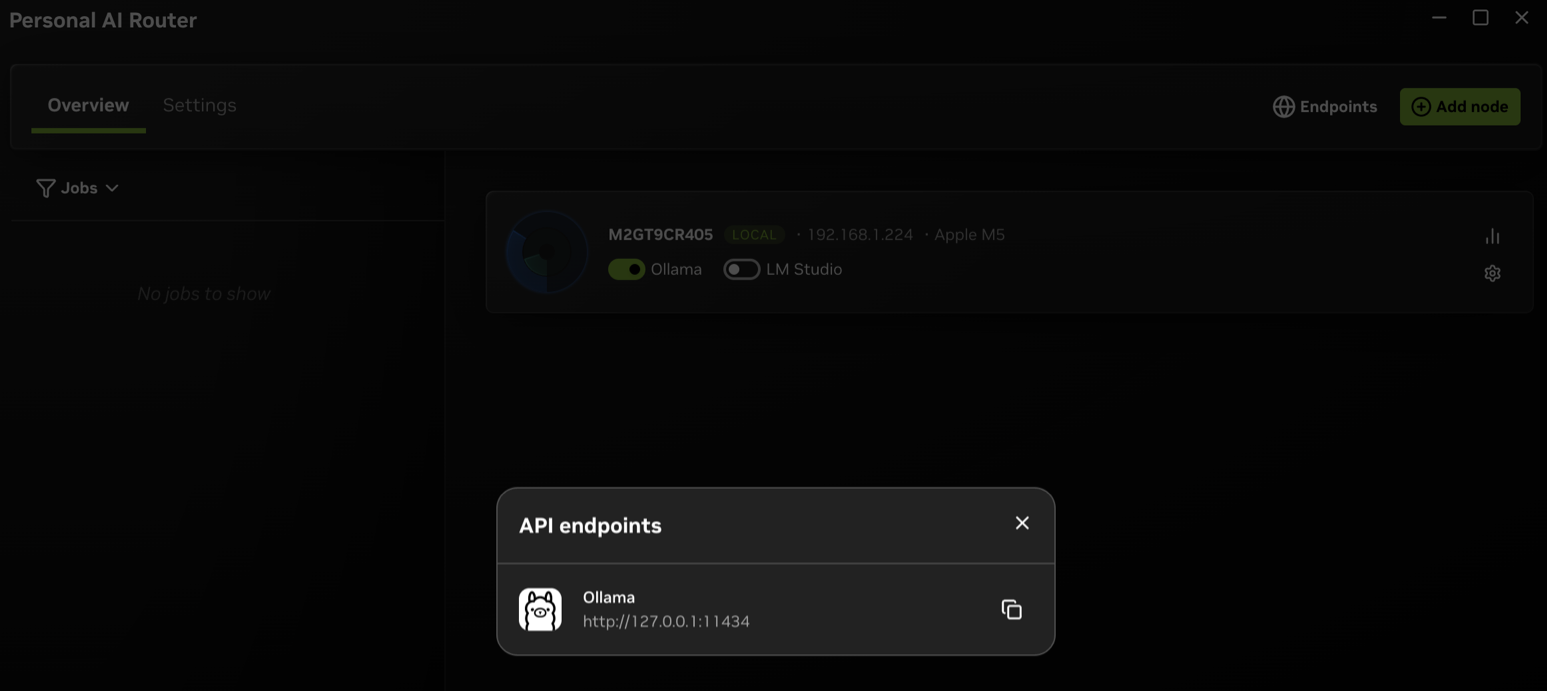
Open Endpoints → API endpoints and copy the address beside Ollama. Its default is http://127.0.0.1:11434, but the value currently shown is authoritative. This is PAIR’s proxy address for clients, distinct from the engine’s Server port. 127.0.0.1 means the computer on which you run the command.

Check the model inventory with the following command, replacing the address if you changed it. In Windows PowerShell, use curl.exe rather than curl.
curl http://127.0.0.1:11434/v1/modelsThe expected response is the inventory the cluster can serve. This checks endpoint response and available names, not successful inference. If the window says No engines are running, return to step 2. For connection refusal, check the current port and service state first.
4. Save an input file and request an answer
Create a folder and save the following as a UTF-8 file named pair-request.json. Replace MODEL_NAME with the exact name you prepared. This is a reusable request record, not a PAIR-native project format.
{
  "model": "MODEL_NAME",
  "stream": false,
  "messages": [
    {"role": "user", "content": "Explain what a network router does in one short sentence."}
  ]
}
In a terminal, change to that folder and run this single line. Again, use curl.exe in PowerShell. The @ after --data-binary reads the saved file; -o saves the response.
curl http://127.0.0.1:11434/v1/chat/completions -H "Content-Type: application/json" --data-binary @pair-request.json -o pair-response.jsonOpen pair-response.json in a text editor and look for message.content inside choices. Expect a short answer about a network router; the exact sentence depends on the model. An error can also be saved as JSON, so file creation alone is not success. Check JSON punctuation, model name, and endpoint separately if the request fails.
5. Identify the serving computer in Jobs
Select Overview → Jobs, find the request card, and read Running on or Ran on. Sent to alone identifies dispatch and does not establish that execution started. Match the model and request time to your saved response so you do not confuse it with another job.
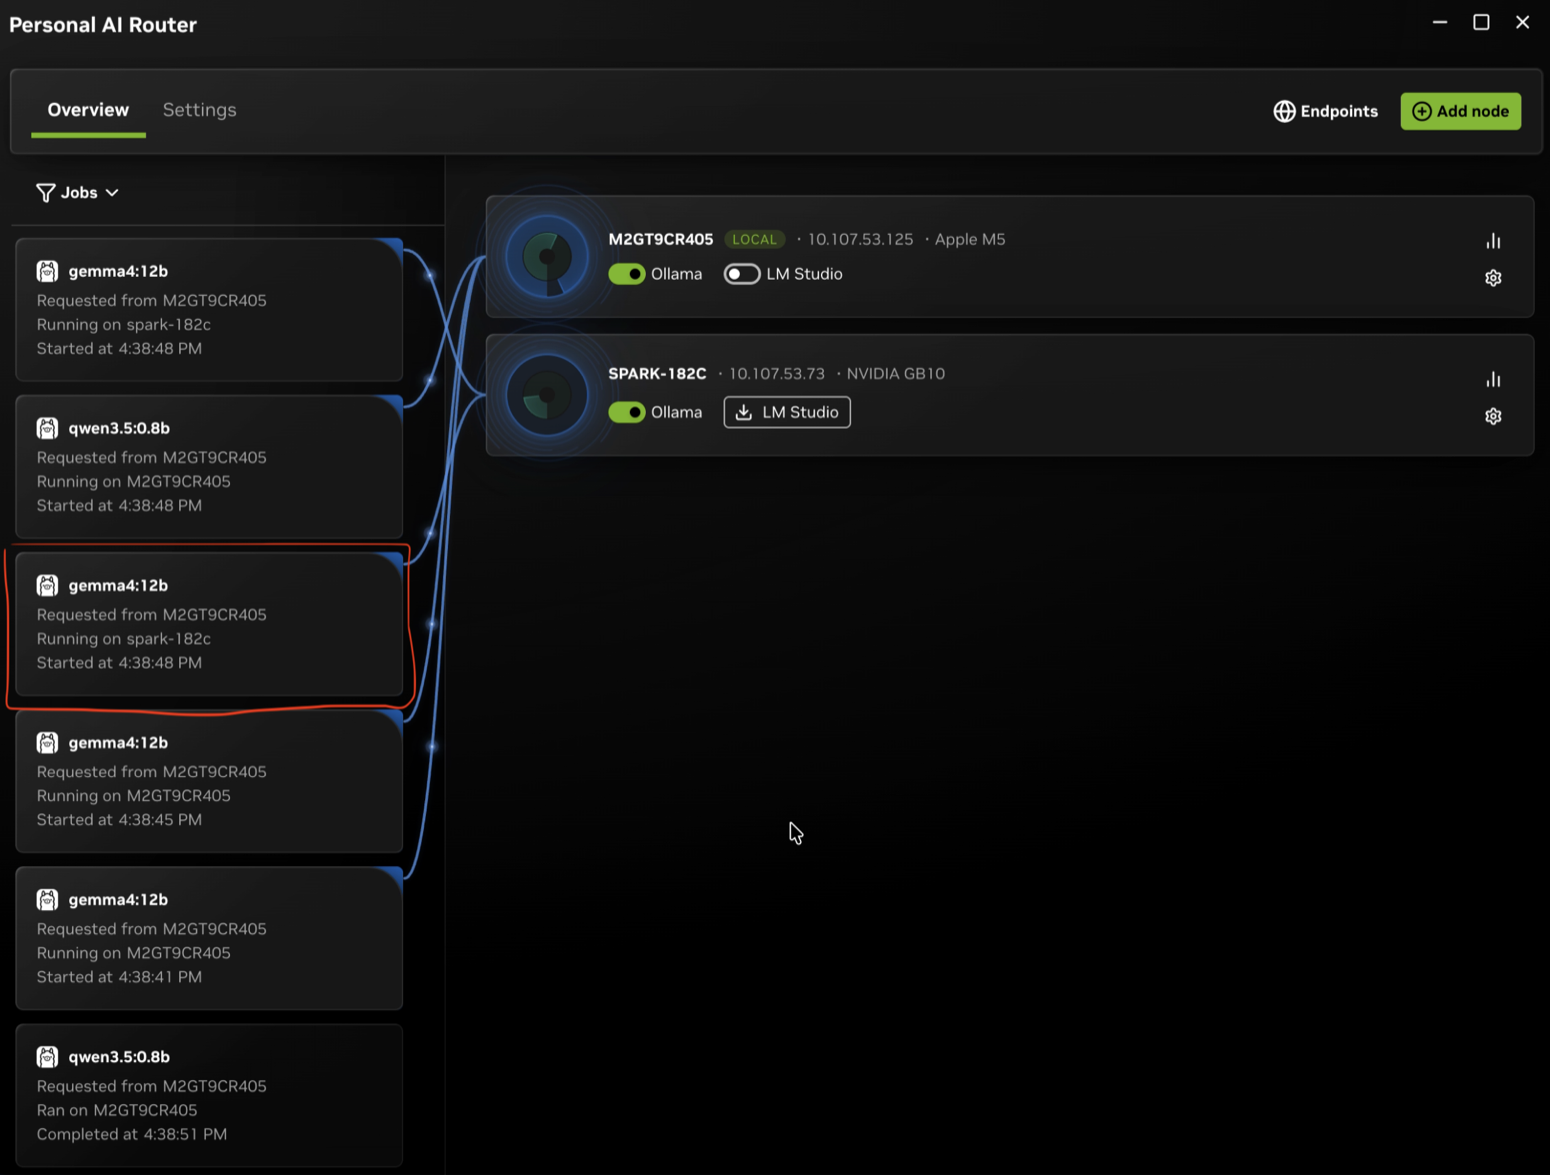

If you receive an answer but Jobs stays empty, check whether another application owns the expected proxy port and your call bypassed PAIR. The official documentation treats this as a distinct symptom. Completion means matching the request to its execution record, not merely receiving a sentence.
6. Isolate and verify routing to a second computer
Run PAIR on both machines. On the first, choose the peer using Add node or Settings → Cluster → Available nodes to add. Enter the six-digit PIN shown on the inviting computer into Cluster invitation on the invited one. Confirm membership under Connected nodes. Only pair computers and networks you trust.
Preparing the same model on multiple nodes increases the eligible destinations, but one request is not guaranteed to choose a remote computer. To isolate remote routing, follow the official verification method: prepare a test model only on the second computer, absent from the requesting computer. You can choose a separate model without deleting an existing one. Copy your request file, change the model name, and send it to the first computer’s local endpoint. The expected confirmation is Jobs naming the second computer under Ran on.
Remote routing verification and distributed performance testing are different tasks. Later, prepare the same model on each eligible computer and record execution locations and total completion time for several independent requests. PAIR does not split one request between computers. Complete the basic checks before judging speed, since model download or initial loading time can otherwise get mixed into the measurement.
Troubleshoot by symptom
| Symptom | First check |
|---|---|
| Connection refused | Current Endpoints address and Settings → Service |
| 502, no eligible node | Running engine, node connection, and model inventory |
| 404 on inference | Stale inventory or an unavailable model |
| 400 or 422 | Request JSON structure and model name |
| Terminal works but browser client fails | The engine’s CORS policy for that client’s origin |
| Node cards or Jobs stop refreshing | Service state and restart under Settings → Service |
For launch-setting changes, consult the engine’s Settings → Apply flow and the official instructions. Browser access requires the intended origin to be permitted. Confirming the terminal request first helps distinguish a browser policy problem from an inference problem; do not replace the policy with blanket access.
Keep a useful record for the next test
Keep the request file, response file, PAIR and engine versions, exact model name, request time, and serving computer together. Preserve the original input and record changed conditions separately when repeating a test. Answer quality, first-response time, and completion time across several requests are different observations.
The completion criteria are an answer inside the saved response, a matching Jobs entry, and optionally verified execution on the second computer. This documentation-derived procedure is not a substitute for an actual success record. Continue with the direct-engine versus PAIR comparison for conditions to hold constant in a future experiment.
Sources & further reading
- https://blogs.nvidia.com/blog/local-ai-rtx-spark-laptops-software-updates/
- https://github.com/NVIDIA/Personal-AI-Router/releases/tag/v1.0.0
- https://www.nvidia.com/en-us/ai-on-rtx/personal-ai-router/
- https://github.com/NVIDIA/Personal-AI-Router/blob/85f523d3624cf1596bdda6e36c28eb8ad3969737/README.md
- https://github.com/NVIDIA/Personal-AI-Router/blob/85f523d3624cf1596bdda6e36c28eb8ad3969737/docs/getting-started.mdx
- https://github.com/NVIDIA/Personal-AI-Router/blob/85f523d3624cf1596bdda6e36c28eb8ad3969737/docs/overview.mdx
- https://github.com/NVIDIA/Personal-AI-Router/blob/85f523d3624cf1596bdda6e36c28eb8ad3969737/docs/known-issues.mdx
- https://github.com/NVIDIA/Personal-AI-Router/blob/85f523d3624cf1596bdda6e36c28eb8ad3969737/docs/engine-settings.mdx
- https://api.github.com/repos/NVIDIA/Personal-AI-Router
- https://github.com/NVIDIA/Personal-AI-Router/pull/27